# Images in the document database
Additionally to TISGraph documents, it is also possible to add images to the document database.
# Import images
Via the menu point "File → Import", you can import documents/images into TISGraph. The following dialog will open:
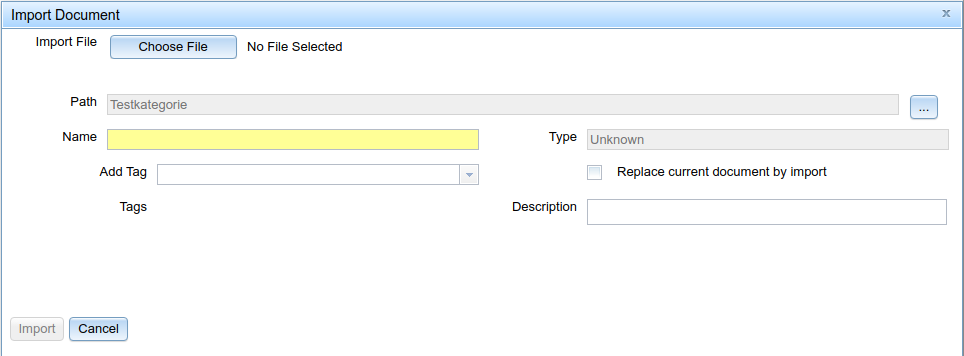
In order to import, you will need to select the file from your file system as well as specify a destination in the document tree and a file name to save under. Optionally, you can also add tags to the new file, as well as a description.
The files are then stored in the TISGraph database, without any changes. The following file formats can be further changed in TISGraph itself:
- Vector graphic: PDF, SVG
- Pixel graphic: PNG, BMP, JPG
vector- and pixel graphics in TISGraph are treated exclusively as images. This means that the standard document manipulation functions (adding objects suc has line, graphs etc. , editing palettes or date ranges,...) are not available for these files. You can, however, use them for georeference.
# Georeferencing images
Images in TISGraph can be "georeferenced", i.e. coordinates of a plot can be mapped to geodesic coordinates. In case of a map, those could be Gauss-Krüger coordinates or UTM coordinates, whereas for the elevation plan of a river dam you might want to use dam coordinates (a coordinates).
On the basis of these depictions it is then possible to add additional graphs or other graphics in front of the profile of a dam. In order to do that, an (an)isotropic mapping of drawn coordinates to geodesic coordinates is used.
To access georeferencing, you need to first open an existing image in the database and subsequently activate the module via Document → Geo-Reference:

First, you will need to define the type of depiction (isotropic or anisotropic), as well as the components of geodesic coordinates (Y/H/H/a/b).
Afterwards, define the drawn coordinates by either entering them manually or by selecting them on the background image via the select icon (geo-select icon). In order to get the most accurate georeferencing possible, it is recommended to use a coordinate pair with the highest possible distance in both x and y direction, for instance by selecting the top left and bottom right corners of the image.
Lastly, complete the georeference configuration by clicking on the "Save" button. If any unwanted changes have been made, click "Restore" to revert to the last saved state.